Boat service: complete guide and useful tips for doing it yourself
Boat service: complete guide and useful tips for doing it yourself
Is it possible to do maintenance on a boat yourself without having to rely on a mechanic?
The answer is certainly yes, it is not a complex operation, you just need to take into account some important details.
Carrying out regular services will also ensure your engine remains in the best possible condition and will reduce the risk of mechanical failure. Learning how to carry out a boat service yourself will also allow you to be more familiar with the components of your boat and also save money on maintenance costs.
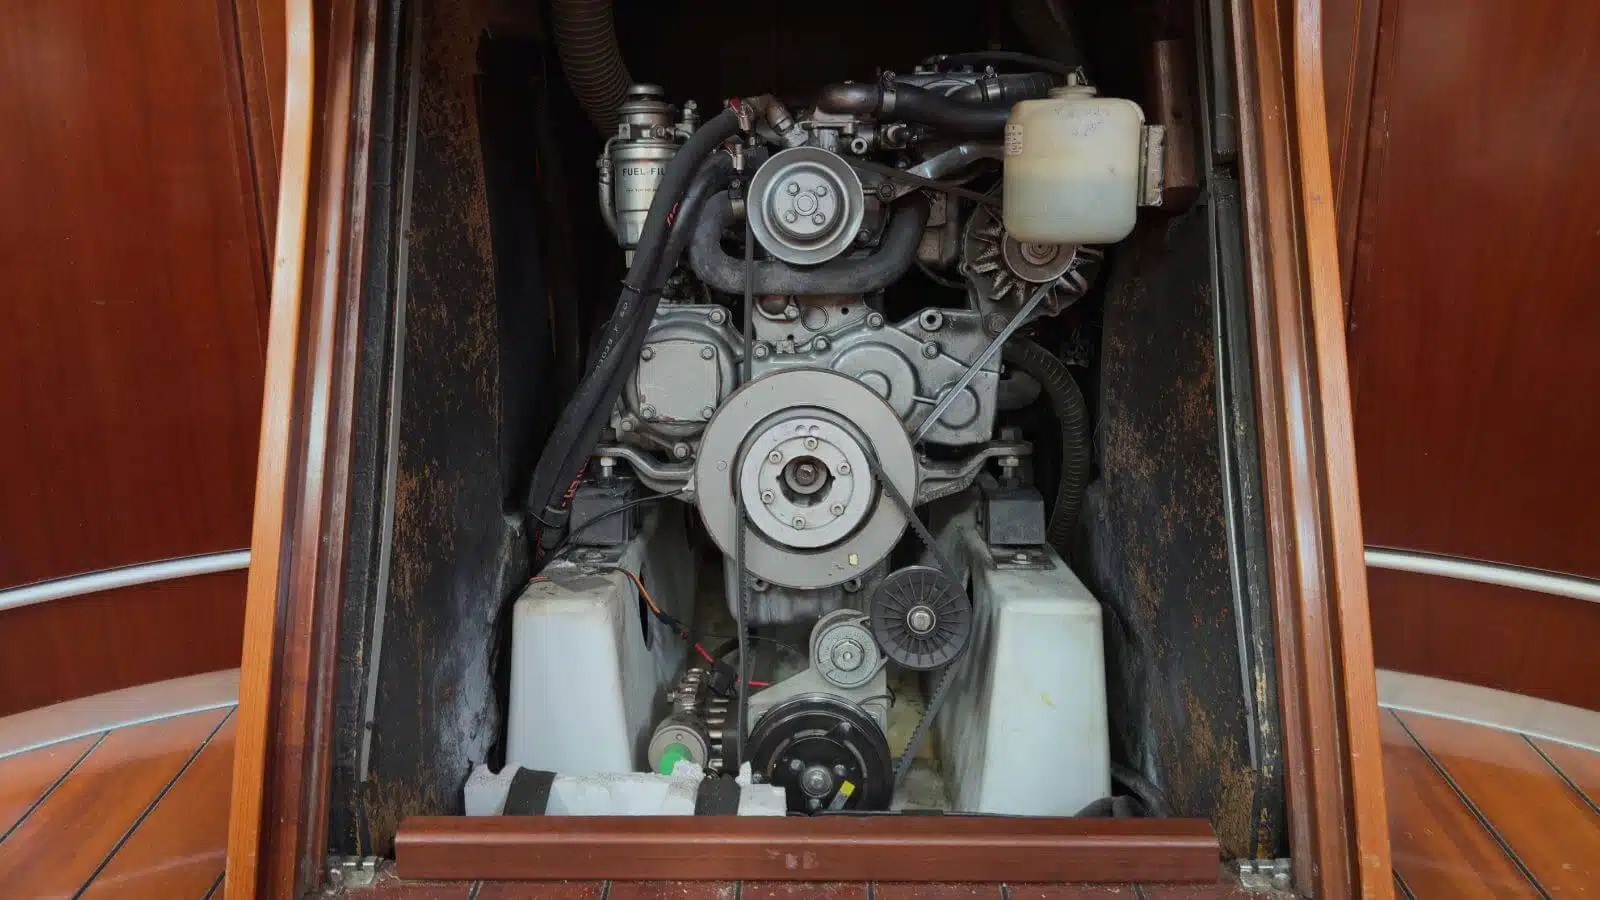
In this guide we will only cover boats equipped with a small or medium-power diesel inboard engine, i.e. small displacement motor boats and most sailing boats.
Do-it-yourself service: differences between sailing and motor boats
In addition to the differences in the style, structure and gait of sailing and motor boats, there are also slight differences for the engines. For example, motor boats may be powered by petrol and others may not have a heat exchanger. In other words, each boat has its own peculiarities and before starting to service the boat, it is certainly useful to download the manual for your model to already have a clear idea of how the various components work.
Tools and materials needed to carry out a boat service
Here is a detailed and reliable list of the basic tools and materials needed to perform boat engine service:
Instruments:
Sockets and wrenches of different sizes for removing bolts and screws;
Allen keys of various sizes for the hex screws;
Phillips and flat screwdrivers of various sizes;
Ratchet screwdrivers for working in hard-to-reach areas;
Torque wrenches to tighten bolts with the correct torque;
Regular pliers and long nose pliers;
Hammer if necessary;
Pump to suck used engine oil;
Work gloves to protect your hands;
Lamp or flashlight to illuminate dark and hidden areas of the engine.
Materials:
Engine oil specific for your engine;
Replacement oil filter;
Replacement fuel filter;
Coolant (if necessary);
Greases and lubricants for lubrication points;
Distilled water for the cooling system (if necessary);
Clean cloths to wipe away any drops of oil or liquids (cloths that absorb oil are recommended).
As mentioned before, it can be very helpful to consult your engine manual to determine exactly which tools and materials are needed for your specific engine service.
Do-it-yourself boat cutting: the phases
Carrying out a boat service is an essential operation to keep the engine in excellent condition. Steps include visual inspection, filter and impeller replacement, oil change and cooling system check. Now let’s see them in detail.
1. Preparation
Get your engine manual, all the tools and materials seen above and make sure the boat is in a safe and stable place to carry out the service.
2. Visual inspection
Unlike car engines, boat engines are usually painted in a solid colour: this is done so that you can easily see if there are leaks. Abnormal oil leaks are immediately noticeable thanks to this contrast between the engine paint and the color of the liquid.
During the visual inspection, check that there are no oil, coolant or water leaks (coming from the cooling system circuit). If you notice the anomalous presence of water, you can use the oldest and most reliable test to understand if it is sweet or salty: dip a finger and taste it.
3. Replacing the engine oil
The first operation of your boat service will be the removal of used oil. To empty the old oil it is advisable to keep the engine running for about ten minutes before the operation. This way the heat will make the oil less viscous, therefore making it easier for you to suck it up.
If there is space, you can put a tray under the tank and let it empty, but if there is not enough space, you will have to suck up the used oil with a pump, which many engines are already equipped with. If your engine doesn’t have one, you can easily buy one, there are different sizes on the market, for our 48 footer we used a small one without a tank.
The pump can also be inserted where the oil level inspection is carried out, as long as you make sure to fish from the bottom of the engine crankcase.
Naturally, throughout this process the oil filler cap must remain open to avoid creating negative pressure.
The second operation concerns removing and replacing the oil filter. To do this, you will have to unscrew the old filter, if possible using a strap wrench.
The theory would be that the filter can be removed by hand, without the help of wrenches. Unfortunately, it is rarely closed in the right way, so when opening the filter it is too tight and difficult to unscrew.
Each boat filter has an OEM code printed on it which gives indications on which model to purchase: this code is useful if you don’t want to buy the part directly from the official retailer, but buy one from another brand. To close the filter it is advisable to pass a finger of engine oil on the rubber gasket of the filter itself, to lubricate it, and then close it by hand. This will guarantee the opening at the next filter change and will save you time and sweat.
After emptying the used oil and changing the filter, you will need to pour new oil into the tank. The oil must be the one indicated by the manufacturer, because there are different types with different viscosities.
Changing the gearbox oil
If the time has come to change the gearbox oil too, the operation is the same. You must remove the cap, suck up the used oil and pour in the new one, making sure to use the correct brand of oil and lubricate the gasket with your finger before screwing it back on.
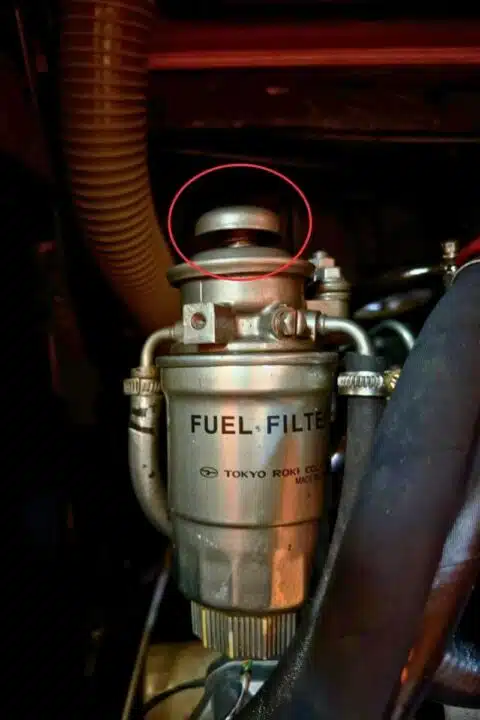
4. Replacing the fuel filters

Replacing the fuel filter is a routine operation when a boat is serviced. Furthermore, it is a process similar to that of oil and rather simple.
First of all, if you have it on board, remember to close the diesel tap at the tank outlet. Then start by unscrewing the top cap carefully, so as not to dirty the surface around it. You can help yourself by preparing a plastic bag to place under the cap, which will collect any fuel leaks.
To remove the bottom cap, you can try by hand or using a strap wrench. As soon as the cap loosens, place the bag underneath and continue unscrewing by hand: this way, any diesel leaks will be collected in the bag and your boat will remain clean.
Once opened, replace it with the new one. If necessary, you can already fill the new diesel filter with fuel (it is a glass after all). As with changing the oil filter, here too you can oil the gasket with diesel to make opening easier.
5. Replacement of the motor impeller
Before opening the impeller compartment, remember to close the engine’s water intake because the impeller is probably below sea level, if you don’t close it you risk water entering. My advice is to put a tray underneath, because as soon as the impeller is opened (by unscrewing its bolts) salt water that has deposited can fall out and without the tray underneath it would go around the entire engine. Those who go to sea know that the less salt water that comes into contact with the engine the better.
If the impeller is intact, the job is simple: with the extractor or with two long-nosed pliers you must delicately remove it from its seat.
If the impeller fragments when removing it, remove all the pieces to prevent them from damaging the new one once in place. Finally, when you insert the new impeller, remember to check its direction of rotation.
An important note is to use the product (liquid petroleum jelly) supplied together with the new impeller. Do not use oil, grease or other products other than the one supplied with the impeller, because in the first moments of starting the engine the impeller runs idle (because it is dry from work) and if you do not use the right lubricant it risks burning even earlier to receive water.
6. Replacing the belt
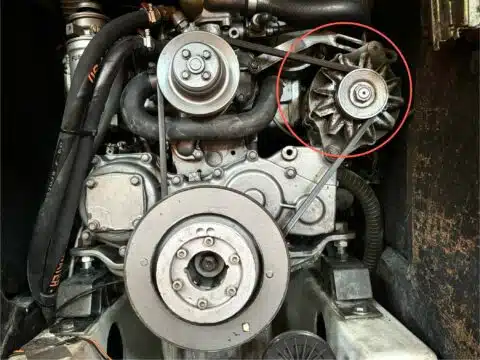
As regards the belt, it is important to check that there is no black dust near the alternator (circled in the image).
After removing the belt, make sure to clean the entire surface around it, so that after putting the new one on you can immediately notice if any more black dust forms.
Should you find any, it means that there is something out of alignment and at that point all you have to do is call a mechanic.
To remove and fit the belt you must loosen the alternator and position it so that it has approximately 1 cm of play. If it is too tight it risks breaking the pulleys, if it is too soft it vibrates and is eaten, creating the black dust we were talking about.
7. Replacing the coolant
On most boats, under the heat exchanger, there is the coolant tank tap. Unscrew it using a wrench and at the same time open the cap located at the top of the tank. By doing so, the entry of air will allow the old liquid to exit the tap.
Place a basin or tray under it and collect the old liquid. Once the tank is empty, turn off the tap and pour the new one out of the cap. The liquid must be compatible with the one already present: it is easy to recognize them because they are produced in a color scale, usually yellow/green, red and blue. Each engine has its own specifications and it is important to respect the manufacturer’s instructions. If you don’t want to buy the official brand, you can buy one from another brand that has the same color.
The latest operations
Before completing the service you will have dirty hands, the engine will be disassembled, it will be hot (because even in winter, it is always hot in the engine compartment) and you will be eager to test your work with the first ignition. That is the moment when you will have to check that all the caps are closed, the bolts tightened, the liquids in their seats.
Equip yourself with a brake cleaner or an industrial degreasing spray: it is a highly degreasing product that evaporates a few minutes after use. This is useful because after completing the boat service you will see drops of oil everywhere: the spray, together with a cloth to rub with, will be of great help in thoroughly cleaning the entire engine compartment. Remove every trace of dirt, it’s damn important to be able to see later if there are leaks.
First ignition after having had the boat serviced: bleeding
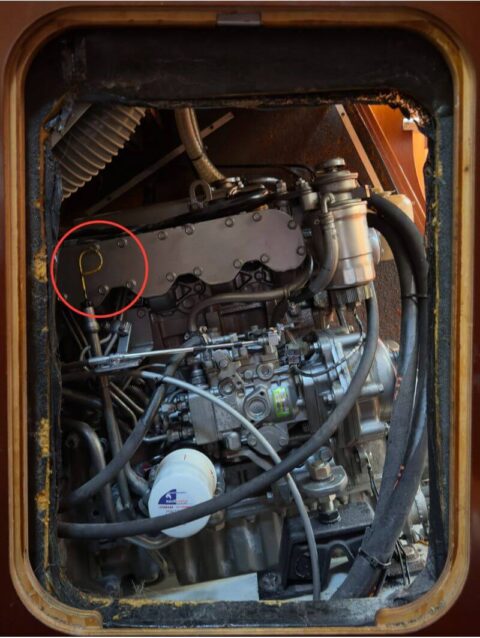
Remember to reopen the seacock of the impeller before starting the engine. By removing the diesel filter you have let air into a circuit that should be sealed, so the engine probably won’t start. You will have to bleed it first.
Using a wrench, open the appropriate bleed bolt located on the injection pump next to the tightening nuts of the rigid ducts that carry the diesel fuel to the injectors and use pump C to release the air from the circuit.
This pump is used to manually pump diesel fuel, with the engine off. Pump C is an integral part of the engine and is often integrated into the diesel filter support, however each engine has its own system and consulting the boat manual may help.
Air will come out of the crack you opened until diesel fuel starts to come out. Only then do you close everything up, clean with industrial degreasing spray and start your brand new engine. You’ve just finished your first boat service.